Monday, October 17, 2011

"Things That Go Bump In The Night" - Happy Halloween

With a nip in the Autumn air, its the season for Halloween, so I have uploaded some things that go "bump" in the night.  Otherwise know as nebulae, these remarkable wisps of gas and dust reminds me of the ghosts and goblins of the season.  Taken last month, all of these deep sky objects are up sometime during the night.

Click on the image for a larger view
The image above is known as "The Wizard Nebula" in the constellation Cepheus.  I don't see a wizard.  Maybe you have better luck at seeing one.  It could be that it looks like a wizard when seen visually through a telescope, but I kinda doubt it, because it's pretty faint.  The camera picks up a lot more faint nebulosity than our human eyes can ever hope to do.  Instead of a wizard, my mind does see a one-eyed black goblin.  It's at the lower right of the image.  Of course, this is just a dark, dusty region out in space.  I can not find an offical name for the "dark nebula", but the Wizard is  called Sh2-142, from a 1959 second version of a catalog by Stewart Sharpless.  The star cluster involved with this nebula is NGC7380, from Dreyer's New General Catalog of 7,840 objects.

The image was shot with my 190mm f/5.3 Maksutov/Newtonian.  I took 12 10-minute shots for a total of 2 hours worth of data.

Click on the image for a large view
The deep sky object at the center of this image is the "Cave Nebula", officially known as Sh2-155, is also in the constellation Cepheus.  Presumably the dark nebula on the right side of the bright nebula reminds one of the opening to a cave.  I, however, see it as the head of a fire breathing dragon with it's body extending to the right.   Do you see the red flames coming out of its mouth? Or maybe it's a cloud of bats.  What do you think?

The image was shot with my 300mm f/4 Canon lens, and my Q453 CCD camera.  I took nine 20-minute shots for a total of 3 hours worth of data.

Click on the image for a larger view
I have annotated some of the other deep sky objects in the field and I have outlined the dragon.

Click on the image for a large view
Double, double toil and trouble;
Fire burn, and cauldron bubble.
                             William Shakespeare

Shakespeare would have loved this image of the "Witch Head Nebula".  There is no trouble seeing this Halloween character.  She seems to be contemplating the bright light at the upper right, which is actually Rigel, the bright blue supergiant star in the constellation Orion.  The Witch Head, lying in the  Eridanus constellation, is a supernova remnant, the left over pieces of a star explosion. Dust particles in the cloud reflect the blue light from Rigel.  The whole area is composed of molecular hydrogen and can be seen as the reddish areas surrounding the Witch Head.

The image was shot with my 300mm f/4 Canon lens, and my Q453 CCD camera.  I took eight 20-minute shots for a total of 2 hours and 40 minutes worth of data.

Saturday, September 24, 2011

The Dark Horse and The Pipe Nebula

Click HERE to see it at its highest resolution

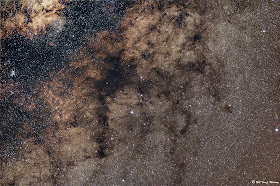
Astronomers have given the dark areas in the above image two familiar names:  "Dark Horse Nebula" and "Pipe Nebula".  The first one is a side view of a "Dark Horse" with the darkest part being the rump and back leg with the fainter head and forelegs to the right.  Can you see that it has one foreleg raised as if it is prancing among the stars?  The Pipe Nebula consists of the rump of the horse as the bowl of the pipe and the rear leg makes up the pipe stem.  Click HERE to see it in high resolution.

The image below is an annotated version outlining the horse and many labels of various "dark nebulae" in and around the horse. Click HERE to see it in high resolution.  The labels starting with the letter "B" are from the Edward E. Barnard catalog of dark nebulae.  Most of the NGC numbered objects are globular clusters (NGC stands for New General Catalog).  I have also outlined some very faint red emission nebulae.  It is best to view it at high resolution on a large monitor as this is the full resolution of my CCD camera.
Click HERE to see it at its highest resolution

The image was taken with my 70-200mm f/2.8 Canon zoom lens set at 70mm and f/5.  A total of 8 images were taken with each image being 15 minutes of exposure.

Monday, September 12, 2011

Green Comet and Globular Cluster

Click on the image for a larger view
The image above is of Comet Garradd as it went by the globular cluster M71 in the constellation Sagitta back on August 26, 2011.  This is the brightest comet in the sky right now, easily visible with a pair of binoculars, but with a couple of provisions.  You need to view it away from the city lights and you need to know exactly where to look.  Because comets are constantly on the move, you will need a star chart for the evening that you go out into the countryside.  Click here to get some printable star charts for the next 6 months (courtesy of Sky and Telescope magazine) as it heads closer to the sun.  Comet Garradd will be visible for quite a long time, so there should be no excuse of not having enough time to see it.

Are you wondering why the comet is green?  One of the few green objects in the night sky, the color is caused by the Sun's ultraviolet light striking the cyanogen gas surrounding the star-like nucleus of the comet making it glow.  The tail is composed of gas and dust, pushed away from the nucleus, by the pressure of light particles from the sun.

The globular cluster, M71, looks to be fairly close to the comet, but not really.  At the time of the picture, the comet was about 130 million miles away from Earth.  M71 is 13,000 light years away.  To make it easier to compare the difference in distances, lets convert the comets distance in miles to light years.  Light travels 186,000 miles per second.  Dividing 130 million by 186,000 gives about 700 seconds.  Now you can really see the difference:  Light takes about 11.6 minutes to get from the comet to our eyes, but from where M71 is located, it takes light 13,000 years to travel from where it is located.

Technical Data:
  • Date Taken: Aug 26, 2011
  • Location: ASKC Dark Sky Site
  • Telescope: 190mm, f/5.3 Maksutov Newtonian
  • Camera:  Q453 CCD (similar to QHY8)
  • Exposure: 30 minutes (consisting of 15 - 2 minute shots)
  • Calibration: 20 Bias, 20 Flats, 1 Dark
  • AutoGuider: Q-Guider with 50mm Finderscope
  • Mount: Parallax Instruments HD 150C
  • Capture Software: Nebulosity
  • Calibration Software: Nebulosity
  • Final Processing Software: Photoshop CS3

Friday, September 2, 2011

Supernova Erupts in the Pinwheel Galaxy

Click on the Image for a large view
On August 24, the Palomar Observatory discovered a supernova in M101, the Pinwheel Galaxy.  The supernova has been getting brighter every day since its discovery.  I took this picture on the evening of August 30.  The star is brighter than the nucleus of the galaxy, which is composed of millions of stars.  M101 is a large face-on spiral near the Big Dipper with an apparent size of the Moon.  It can just barely be seen with a pair of binoculars from a very dark sky, but now the supernova will be brighter than the galaxy, at least until the explosion dies away in a few days.

Click on the image below to show you a labeled picture pointing out the location of the supernova and a few supergiant star forming areas in the galaxy. Three galaxies near M101 are also labeled.  They are NGC5471, NGC5473 and one that almost looks like a star, PGC49919.  They look smaller than M101 only because they are much further away from us.  M101 is 23 million light years away and 170,000 light years across.  This supernova, designated 2011fe, is being studied by the scientific community.  The early detection, combined with the relative closeness of M101, makes this a spectacular find for professional researchers.  Here's a light curve of magnitude measurements (visual, R, V, and B) that the America Association Variable Star Observers has received.


Friday, August 12, 2011

The Needle Galaxy - NGC4565

Click on the Image for a Larger View
Commonly known as the "Needle Galaxy" because of its narrow edge-on appearance, this spiral galaxy is formerly labeled NGC4565 in the constellation Coma Bernices. Another way to imagine it: Think of a dinner plate with a glob of mashed potatoes in the middle of it, then look at this plate from the edge.  The mashed potatoes is the bulge of stars at the center of the disk.  The plate is the rest of the galaxy consisting of blueish areas of star formation and massive lanes of  dark dust and gas circling the disk.  The "Needle" spans 100,000 light years in diameter and is 30 million light years from Earth.  One of the prettiest edge-on galaxies in the night sky.

Many other galaxies, much further away and therefore fainter and smaller are strewn throughout the image.  I have labeled some of the brighter ones in the image below.  If you can't see these galaxies, then your monitor is too dark.
Click on the Image for a Larger View

Technical Data:
  • Date Taken: 04-02-2011
  • Location: ASKC Dark Sky Site
  • Telescope: 190mm, f/5.3 Maksutov Newtonian by Orion
  • Camera: Q453 CCD, 3032(h) X 2016(v) pixels
  • Exposure: 1 hour (consisting of 4 - 15 minute shots)
  • Calibration Exposures: 20 Bias, 0 Flats, 1 Dark used to make a "Bad Pixel Map"
  • AutoGuider: Q-Guider with 50mm Finderscope
  • Mount: Parallax Instruments HD 150C
  • Capture Software: Nebulosity
  • Calibration Software: DeepSkyStacker
  • Final Processing Sofware: Photoshop CS3

Sunday, July 10, 2011

Milky Way

Click on Image for a Larger View

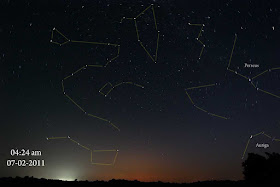
This is our home galaxy, which we call the Milky Way.  The 10mm lens I used gives  a 107-degree diagonal view.  From the horizon to just past overhead.  The whole thing extends across the whole sky and circles underneath our feet in one huge ring.  We see the part under our feet in the Winter sky.

Only from a dark site, away from the light pollution of our cities, can you see it in all its glory.  But even when you can see the Milky Way from a dark site, you won't see it quite this way.  Our eyes see with a bit more subtlety.  Only in photographs do we see it with this much color and contrast.  The clouds of stars, nebulae and dark dusty areas are very easy to see.

The above image took almost 3 hours to take.  I piggybacked my Canon Xti with my 10-22mm lens (set to 10mm at f/5) on top of my telescope and took 22 eight minute pictures.  I combined, aligned and stacked them in DeepSkyStacker then processed it in Photoshop.

I have outlined the major constellation in the annotated image below.
Click on the Image for a Larger View

Wednesday, July 6, 2011

How To Take Star Trails Around The North Star

Click on the Image for a Larger View


Star trails are easy to take with your digital camera, but before I tell you how I created the above image, a few things about the picture.  The image is a 5.5 hour long exposure of the northern sky centered at the "north celestial pole" of the Earth.  As we rotate with the Earth during the night, the stars seemingly rotate counter-clockwise.  They rotate in smaller circles around a point near the "North Star".  This point is the axis of the Earth extended to the sky and is called the north celestial pole.  Also notice that the North Star is not exactly at this point.  The red glow centered above the tree line is the light pollution glow from Kansas City, about 50 miles away.  The brighter white glow on the left is from the La Cygne power plant, about 5 miles distance.

The image is NOT one long exposure, but a combination of eighty one, 4 minute shots.  I started the first exposure at 10:54 p.m. and the last exposure ended 5 hours, 30 minutes later, just after atronomical twilight at 4:24 a.m.  All taken with my 10-22mm wide-angle lens set to 10mm on my Canon XTi digital.

A little bit of forethought is required to take a shot like this.  You can take one long shot, but if you do, you are more likely to get a very bright, over exposed picture.  It is better to take shorter exposures and combine them later.  This is what I did:
  • Before dark, I put the camera on a tripod.  I replaced the camera's battery with its AC-power adapter (I didn't want the battery to run out of power in the middle of the shots).
  • I set the lens at its widest view, 10mm.  I then auto-focused the lens on the distant horizon.  I turned off the auto-focus switch (you don't want to use the auto-focus feature because the stars are too dim for the lens to focus on).  Being careful not to bump the focus setting.  I then set the shooting mode to M (Manual) and dialed the shutter speed to Bulb.
  • Once it got dark, I composed the picture by taking a few test shots.  I settled on individual 4 minute shots, with the lens set at f/4 and the camera at ISO 400.  A little bit of math told me that I would need about 75 shots for the 5 hours of darkness.  I used a "timer remote controller", setting the remote to take 99 shots, each shot set at 4 minutes with a 2 second interval between shots to allow each image to be saved to the memory card.  I pressed the Start button on the timer and walked away.
There is one thing that can ruin a shot like this, and that is dew.  If the night is humid, the lens will fog over with dew.  I get rid of dew by attaching a dew heater around the lens.  The heater is usually run with power from a battery.  Even a simple 9-volt battery will work.  I make my own dew heating straps using resistors.  The other thing that I have done is to blow away the dew every once in a while with a hair blower.  That being said, I did not have a dew problems.  There was just enough of a breeze to keep it at bay.

Now comes the easy part, combining all eighty one pictures. How can that be easy, you might be saying?  It is easy because someone has created a program that does it all automatically. Achim Schaller, from Germany, created the program and it is "Free".  Here is the website: http://www.startrails.de/html/software.html  All you do is load the images, press a button, and in a few minutes it is done.  It's supposed to create a video also, but I couldn't get it to work.

Click on the Image for a Larger View

Above are the first and last frames from the eighty one images.  You can see how much the sky has rotated in 5.5 hours

Wednesday, June 22, 2011

Colorful Nebulae around the Antares and Ophiuchus Region

Click on Image for Larger View

This is one of the most colorful regions in the Milky Way.  Visually, even with the largest telescope, you won't see it anything like this.  It takes long exposure photographs to bring out the beautiful colors, and is why I like to take pictures of the night sky.
Known as the Rho-Ophiuchus Nebula Complex, it consists of blue reflection nebulae, red emission nebulae, dusty, dark nebulae and a rare yellow-orange reflection nebula surrounding the Red Giant star Antares at the lower-left of the image.  The triple star Rho and the blue reflection nebula surrounding it is located in the middle-lower section of the image.  The colors of these nebulae are fascinating, but what is really amazing to me are the "Dark Nebulae".  These filaments of dark-brown regions consist of light years of dust.  So much dust they block the Milky Way starlight in the background.  Dark Nebulae were discovered by the pioneering astrophotographer Edward E. Barnard in the late 1800s.  He created a catalog of 349 dark nebulae.  Each has a number with the letter B in front of it.
Other objects in the image include Globular Clusters.  M4 is largest and easiest to see.  It is the big ball of stars located below Antares.  Very much smaller is NGC6144, just to the right and a little below Antares.  Three others, even smaller globulars are in the image, but look like large stars (To see where they are, take a look at the annotated image below).


Technical Data:
  • Date Taken: 06-04-2011
  • Location: ASKC Dark Sky Site
  • Lens: Canon 28-200mm f/2.8 L IS (set to 100mm at f/4)
  • Camera:  Q453 CCD, 3032(h) x 2016(v) ~ 6.11M pixels
  •  Field of View: 13.6 degrees X 9.0 degrees
  •  Calibration Exposures: 20 Bias, 0 Flats, 1 Dark used to make a "Bad Pixel Map"
  •  Exposure:  2 hours (consisting of 8 - 15 minute shots)
  •  Calibration Exposures: 20 Bias, 0 Flats, 1 Dark used to make a "Bad Pixel Map"
  •  AutoGuider: Q-Guider with 50mm finder
  •  Mount: Parallax Instruments HD 150C
  •  Capture Softwar: Nebulosity
  • Calibration Software: DeepSkyStacker
  • Final Processing Software: Photoshop CS3

Wednesday, June 15, 2011

ISS Passing Overhead

 
Last evening I set up my Canon XTi with a new 10-22mm f/3.5 lens to capture the International Space Station as it crossed almost directly overhead here in the Kansas City area.  The Moon was shining brightly and it was not quite dark, so there was quite a bit of nice blue color in the sky as well as some fast moving clouds.  Here it is on YouTube:


Tuesday, May 10, 2011

Feeding Frenzy of Feathered Friends

Click on Image for a Larger View

Do you know what bird this is?  Hint - It's probably one of the most abundunt of all the birds in the world, so much so that it's become somewhat of a pest.  It was introduced to North America when 50 pairs were brought over from Europe and released in Brooklyn, New York in 1852.  They have spread into the far north of Canada and into Central America.

This is the female House Sparrow feeding it's babies right outside my back door.  There are four babies in total.  Gloria and I have much fun watching them stick their little heads out of their nest begging to be fed.

Click HERE to see a picture I took last year of a male  House Sparrow mating with the female.

Tuesday, May 3, 2011

More Birds of Prey

Click on Image for a Larger View

Thanks for all the nice e-mails I received on what type of  hawk is in the picture of my previous installment.  These guys can really be tough to figure out.  They tend to look very similar, so we have to look at the details.  So, more images would be nice, right?  I took 61 pictures of these visitors (there were two birds, one of them staying up in a tree).   So, as I went through the rest of the pictures I found the one you see at the top.  The hawk in the previous image is now slightly below the new hawk you see here.  As you can see, the main difference is the bars on the breast versus the streaks on the other.  I was suspicious that the lower bird was an Immature Red-shouldered Hawk, so when I saw the image of the other bird, it confirmed it.  The bars on this bird are on an adult Red-shouldered Hawk.

Take a look at these really nice images of Red-shouldered Hawks taken by Raul Quinones and you'll see the resemblance is very good: Red-shouldered Hawk by Raul Quinones

Monday, May 2, 2011

Bird of Prey

Click on Image for a Larger View

I spotted this beautiful bird of prey perching on my satellite dish, scanning my backyard for a juicy rodent I'm sure.  I quickly grabbed my Canon camera, put my 300mm lens on it and took this picture.  I'm pleasantly surprised at the nice quality of the image, considering I was shooting the lens hand held, through a plate glass door and leaves from a foreground bush.  I did help to keep it steady by turning the image stabilizer on and shooting at 1/2000 of a second.  I also leaned the front of the lens against the plate glass.  A few mintes later, it flew to a nearby tree, but then flew back down to the lawn.  I think he was looking for moles, because I know I have lots of mole hills in my yard.

I think I know what type of hawk this guy is, but I'm not sure.  Let me know what you think it is.

Sunday, April 17, 2011

The Owl and the Cigar

Click on the Images for Larger View
At the upper left of this image is the spiral galaxy M108 and at the lower right is the planetary nebula, M97, also known as the "Owl Nebula".  Both of these object are in the constellation Ursa Major, now seen high in the sky during this Spring season.

Looking like a big, fat cigar, M108 is a spiral galaxy viewed edge on.  Unlike most spirals, there is no bright central bulge seen here, apparently because the there is so much dusty matter hiding it from our view.  These dusty knots are easily seen in the enlarged image.

The two dark spots make this nebula look like a spooky owl.  Classified as a planetary nebula, it is no planet, but a star toward the end of its life.  The star in the center of the nebula is literally blowing its outer layers into space creating an ever enlarging bubble.

Even though it may seem like these two objects are relatively close to each other, it is far from it.  The Owl Nebula is 3,000 light years from us and well within our Milky Way galaxy, but M 108 is about 45 million light years away, 15 thousand time further away than the Owl.  If you look real close at the enlarged image and your monitor is not adjusted too dark, you'll see a very small galaxy to the lower right of the Owl (right next to a star).  Just to the left of the Owl are a few even fainter galaxies all at enormous distances from us.

In this graphic of Ursa Major, there is a small rectangle just below the bowl of the Dipper.  This is the area taken up by the top picture.

The almost two hour exposure of the image is a combination of 11 ten minute shots taken with my 190mm Mak/Newt f/5.3 telescope.

Sunday, April 3, 2011

Eagle Nest with Babies

Click on Image for a Larger View

These are captured frames from a streaming video of a pair of bald eagles in the process of raising three babies.  On this date 4-3-2011, two of the three eggs have hatched.  The images below show one of the eagles feeding the oldest baby, born on 4-2-2011 scraps of rabbit meat.  The other baby born today, can't quite take food scraps yet.  Take a look at this marvelous live video feed from the nest in Decorah, Iowa at this link:
Decorah Eagles

Wednesday, March 16, 2011

Jupiter and Mercury Conjunction

Click on image for a larger view

The word "conjunction" may bring back memories of english class, but it's a totally different meaning in astronomy.  In this case it means the meeting of two or more celestial objects in the sky.  In this case, Jupiter and Mercury were just about 2 degrees apart on the evening of March 15, 2011.  Watch them in the western sky for the next few evenings and you'll see Jupiter drop lower in the sky and Mercury rise higher.

This image was taken with my Driod X cell phone.

Even though these planets seem to be very close together, they are actually billions of miles apart.  Mercury is a little over 93 million miles away, but Jupiter it about 550 million miles.  If you  were to view the Sun and these planets from out in space they would look like the graphic below.

Click on the image for a larger view

Monday, March 14, 2011

Winter Scenes with my new Droid X cell phone

Click on each Image for a Larger Image

We got about 4 or 5 inches of snow overnight, giving me a chance to try out my new camera.  

The Winter scenes above were taken with the camera on my new Droid X cell phone.  The camera installed on the latest phones are pretty remarkable.  Clicking on the images above will give you an image that is 1600 X 902 pixels.  This is only about half of what the 8 MPs camera actually gets, which is 3264 X 1840.  The quality of the images is amazingly good, considering the lens is only about 1/16" in diameter.  This lens does double duty, since it is also used for HD video that can be watched on a big screen HD TV (something I need to try as soon as I get an HD cable that connects the phone and the TV).

This in no way takes the place of my Canon  camera and lenses.  I have quite a bit more control with my Canon equipment than I do with my Droid X, but for a point and shoot camera, I can be sure to get a high quality image when I don't have my Canon with me.  I just have to be aware of its limitations, but for a phone, it can take some really nice pictures at a moments notice.

Thursday, February 24, 2011

It's A Wonderful Life - Stephan's Quintet

Click on the image for a larger view

What galaxy photo do you think has been seen by more people than any other?  Your first thought might be that it could be the Andromeda galaxy, but I'm thinking it might be a group of galaxies instead.  In one of the most watched movies of all time, the 1946 movie "It's A Wonderful Life", there is a short scene at the beginning of the movie where God an two angles are talking.  God and one angel are represented by galaxies and a star represents a third angel.  These galaxies, called the Stephan's Quintet and are the subject of my latest astro photo above. I snatched the second image from the movie on YouTube:
http://www.youtube.com/watch?v=I_lR6HEdOb8

My image, taken last Fall, is a three hour exposure using my 7.5" Mak/Newtonian, 1000mm focal length telescope.  Stephan's Quintet is the group of 5 galaxies at lower left.  At the upper right is the beautiful spiral NGC 7331.

NGC7331 is the largest member of a cluster of galaxies, some of which you see above and below the galaxy. At 49 million light years away, NGC 7331 is similar in size to our own Milky Way galaxy.  The other galaxies are further away a varying distances.  A unusual thing is going on with this galaxy.  Astronomers have determined that the central bulge of stars in NGC7331 are rotating opposite that of the rest of the galaxy.  This was probably caused by infalling material, probably from smaller galaxies millions of years ago.

Stephan's Quintet was discovered by Edouard Stephan in 1877, however, only four of the five are actually part of the group.  The largest galaxy in the grouping only seems to be close, since it is 7 times closer to us (40 million light years), while the other four galaxies are 290 million light years away.  Click on the above image to bring up a larger image and notice that they are not normal spirals, but are distorted and have long arcing arms.  This is because the galaxies are violently colliding with each other.  Over millions of years, they will merge into one large elliptical galaxy.  To see a really nice Hubble Telescope image and more interesting information go to:
http://en.wikipedia.org/wiki/File:Stephan%27s_Quintet_Hubble_2009.full.jpg

Thursday, January 27, 2011

How To Take Pictures Of Waterfalls

Click On The Image For A Larger View

Waterfalls are a magical show of sight and sound.  Capturing these tumbling cascades of rushing water with your camera is not hard, but taking one that you will treasure requires some forethought and planning.  This particular waterfall, called Soco Falls, was taken just east of Cherokee, North Carolina not far from the Blue Ridge Parkway and the Smokey Mountains.  It is located on a winding road with a very small parking area near the road.  A 5-minute hike down to a wooden platform on the steep hillside gives you a nice view of the falls.  Click here for directions to the falls.

I took a few pictures but the lighting was not good.  The falls were lit by a high afternoon sun, with dark shadows and bright highlights.  I wanted more subdued light so I came back late in the evening, when the sun was no longer shining directly on the scene.  Instead of shooting from the wooden platform looking down on the falls I decided to hike down near the creek below the falls.  Carrying a camera and a tripod was not easy on the slippery path of rocks and mud (later I found out that a few people have fallen to their death at these falls).

With my camera on a tripod, I set my zoom lens to its widest view, 18mm.  To get the silky-water look you need a fairly long exposure, so I set my camera to aperture priority mode.  Aperture priority lets you set the f/stop (its aperture) manually while the camera sets the shutter speed automatically.  The larger the f/stop number you use, the longer the shutter speed has to be to get the same amount of light into the camera's sensor.  The setting for this picture was f/22 with a shutter speed of 8 seconds and an ISO 200.  The other thing that you need is a shutter release cable otherwise just you touching the camera's shutter button will blur the image.

Long exposures to capture the moving water is almost impossible in bright sunlight, so wait for more subdued lighting.  Cloudy, even rainy days are perfect.  Stop down the lens for long exposures to get the silky-water look.  And finally, taken lots of pictures from many viewpoints.  One is bound to be just the one you are looking for.

Wednesday, January 12, 2011

How To Take Pictures of Lightning

Click on image for a larger view

Not a Winter scene for this cold first month of a new year, but a Summer scene I took back in 2007.  This was taken from the Astronomical Society of Kansas City's dark sky site south of K.C.  Instead of viewing stars on this particular night, we were viewing one of natures marvelous light shows instead.  The lightning was far away from us.  The smoke you see near the horizon is coming from a power plant about 12 miles away, so the lightning is striking some distance beyond that.

Taking pictures of lightning is fairly easy.  First and foremost, take them from a good distance away and not in the middle of the storm itself.  Needless to say, lightning strikes are extremely dangerous.  Instructions for Digital Single Lens Reflex cameras are shown here, but non-slrs can also be used, you'll just have to read your camera instruction book to learn how to set it in manual mode.  And of course learning how to use your camera's various modes is always a good thing.
  1. You'll need to have a camera that allows you to set it manually.  Most of the time auto exposures and auto focus do not work in this type of situation, so you'll need to set your camera to manual mode.  Once in manual mode set it to "Bulb".  This setting allows you to hold the shutter open and take long exposures.
  2. You will also need a shutter release cable to allow you to open the camera's shutter without physically touching the camera.  Touching the camera during a long exposure will of course jiggle it ruining the image.
  3. A tripod is a must, since hand holding the camera during a long exposure will also ruin the picture.
  4. Getting a good focus is a little bit tricky, but easy if you know how.  You first need to auto focus the camera on a distant object.  This could be a distant street light or something bright enough so that the camera can focus.  The camera will not focus on darkness or very dim light, so if you leave auto focus on while trying to image the lightning, the auto focus will not have time enough to lock on a brief lightning flash, so it's best to focus on something bright, then turn auto focus off.  The camera will now be in focus so long as you dont touch the camera's focus ring or zoom.
  5. Set the ISO speed to about 400 or so.
  6. Once the camera is set, put it to where the lightning is flashing the most, open the shutter with the cable release and wait for it to flash.  Once you see a flash or two, close the shutter.  Take a look at the camera's LCD screen to see how it turned out, then quickly open the shutter again.
You can get more than one lightning strike on the same image, like I did in the above image, but be aware that sometimes too many will wash out the image.  It's all trial and error, so just keep shooting.  It's just like fishing.  Once in a while you'll get a big one.