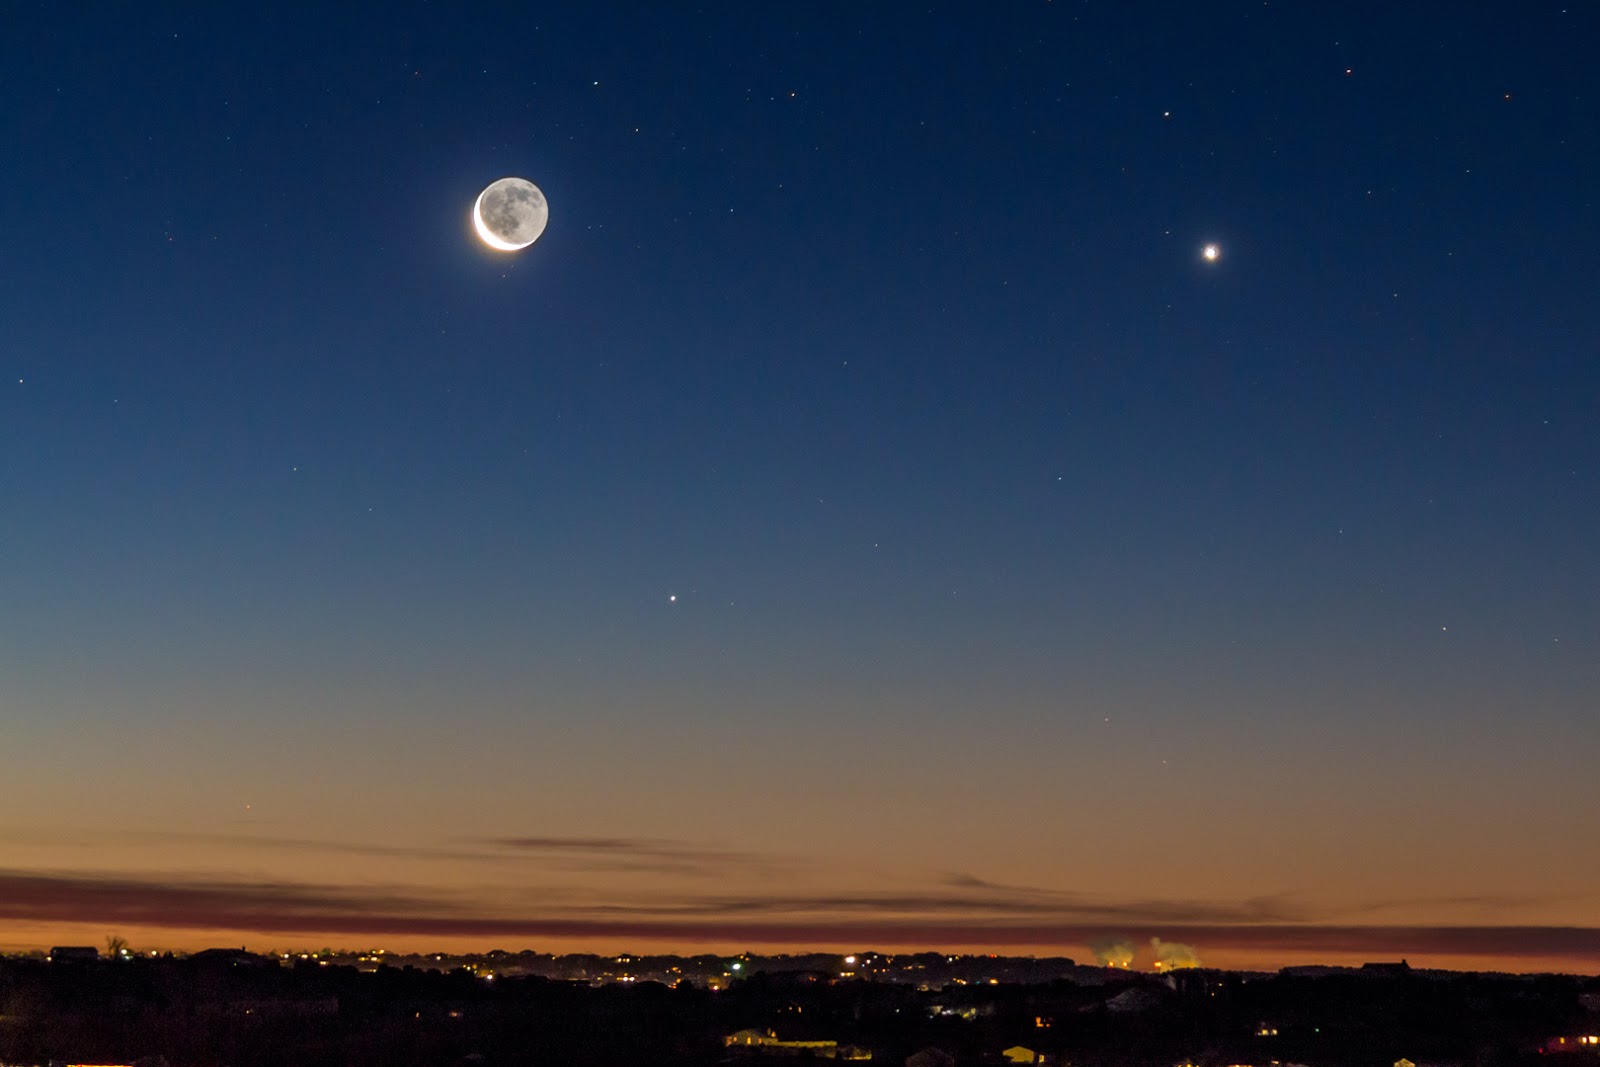
Monday, November 9, 2009

Red Giant become a video star

Below is a video showing the planets and a few stars to scale. One of the last stars in the video is Herschel's Garnet Star mentioned in the post below. The star is also known as Mu Cephei. Mu Cephei is so huge that if the Sun were to exchange places with it, the Earth would be inside the star. This red supergiant would also swallow up Mars and Jupiter and almost reach out to the orbit of Saturn.


Red Giant meets Red Nebula


Click on each image for a large view
IC1396 is cataloged as a star cluster embedded in a nebula. Right in the middle of the nebula, the star cluster is easy to see in binoculars, but in this long exposure photograph it is overpowered by the nebula. This is a very large nebula, about 2.5 degrees across (5 full moons would span across it), but it is very far way (2,450 light-years) and very hard to see visually.
***
The bright star at the top is one of the largest known red supergiants in the Milky Way. William Herschel described it as "a very fine deep garnet color" and is therefore commonly know as "Herschel's Garnet Star". So why is it yellow and not red in the picture? The main reason is that in long exposure images bright stars tend to get overexposed and loose their color. In this case yellow was the result. Astronomers who view this star through large telescoes see it more orange that red.
***
The bottom image was a very nice surprise! I wanted to create an image with legends pointing to the various known objects in the nebula, so I turned into in a black-and-white image. When I did this I tried using a red filter. The result was a much brighter nebula that constrasted nicely with all the dark dusty regions (5 of them are Barnard Dark Nebulae). On the right side is a dark globule known as the "Elephant's Trunk" and vdB142.
***
Technical Photo Info
Camera: Q453 CCD
Lens: 300mm f/4 L IS
Apeture Setting: f/4
Exposures: 9 X 10 minutes (90 minutes)
Darks: 2 darks to create dark pixel map
Flats: 0
Biases: 20
Mount: Celestron CGE
Guide Camera: CCD-Labe Q-Guider
Guidescope: 400mm Tasco refractor
Calibrated, Aligned and Stacked in Nebulosity
Final processing in Photoshop

Tuesday, November 3, 2009

Not So Clear Sky Imaging

Click on image for a larger view
What to do, what to do? My imaging equipment is all set up for the night, but here comes the clouds. High cirrus are sailing across what was a clear and cloudless sky while I was setting up. I really want to try out my new lens on the sky, so I decide to try a few shots anyway. I take six shots, ten minutes each. By the time the last exposure is done, the sky is pretty well covered with clouds. As they come into my laptop I see that each image has halos around each star, with the last image having the largest halos. As I shut down the computer, I'm thinking that will be the last see of those pictures.
***
That was two months ago. Today I saw an image by Rogelio Bernal Andreo on the Astronomy Picture of the Day website that had practically the same framing and image scale of what I took that night. My my, what a picture it is. Here is the link to his picture: http://tinyurl.com/yj3txu2 After seeing this I decided to process my images to see what I had (a single image doesn't show much, only when they are aligned, combined and processed does the detail come out). My picture doesn't go as deep as Mr. Adnreo, for a lot of reasons, but I am happy the way it came out. The glow around the stars give the picture a mystical quality, and the Califonia Nebula and the Plieades Star Cluster still show through. The dusty dark nebulae throughout this part of the sky is also evident. The dark nebulae are labeled in the second image above, but as you can see, they are actually spread all over the area.
***
Technical Photo Info
Camera: Q454 CCD
Lens: Canon 70-200mm f/2.8 L IS
Focal Length Setting: 70mm
Apeture Setting: f/4
Exposures: 6 X 10 minutes
Darks: 2 darks to create a dark pixel map
Flats: 0
Biases: 0
Mount: Celestron CGE
Guide Camera: CCD-Labs Q-Guider
Guidscope: 400mm Tasco refractor
Calibrated, Aligned and Stacked in Nebulosity
Final processing in Photoshop

Friday, October 23, 2009

Saturn, Venus, Mercury & Moon Conjunction

Click on picture for larger view
Planet conjunctions are some of the prettiest scenes in the morning sky. When a thin crescent Moon is in there, it is even more beautiful. About 6:30 a.m., Friday morning October 16, I looked out of my RV window and saw the above scene. I jumped out of bed, grabbed my camera, slapped it on my tripod, put a jacket over my pajamas and stepped outside and started shooting various exposures before twilight washed it out. These type of events last for only a few minutes, where the color and lighting is just right. Before that magic moment, the sky is too dark and afterwards the sky is too bright. This conjunction has Saturn at the top, Venus below it and Mercury near the horizon, and of course the Moon.


Click on the image for a larger view
Not all conjunctions appear in the morning sky. The next conjunction with the Moon in the scene is on December 20, 2009 evening sky, about 6:45 p.m. In this scene, the planets are Jupiter and Mercury. On this date, Venus and Saturn are still only visible in the morning sky, with Venus being only 5 degrees from the Sun and probably too close to see. How do I know this information? Well, I use a planetarium program called Starry Night Pro. It's very easy to find conjunctions like these. I lock the view on the Moon, then go forward day by day and watch for the Moon to be near planets, bright stars, etc. I then mark my calendar and wait for that date and hope for a clear sky.

Wednesday, October 7, 2009

Mellow Yellow - Aspen Fall Colors in the Rocky Mountains

Click on picture to see a larger image
Mountain Valley Panoramic in Rocky Mountain National Park
****
For a slide show of the Aspens in the Rockies click here:
Once in the show, click the f11 key for a better view
****
I spent a few days visiting my daughter and family in Colorado. Her family moved to Castle Rock, CO from Florida. Quite a change in climate and altitude. She had a housewarming party for all the relatives in Colorado and got a chance to visit with a few I had not seen in many years.
*****
The Aspens were changing color at higher elevations, so my wife Gloria, daughter Pam, four year old grandson, Tyler and I spend a wonderful day driving around looking for scenes of golden light to photograph. In the morning, we drove through Denver up to Loveland, the west up the Thompson Canyon to Estes Park. We had no time to stop and enjoy the towering canyon, nor buys Estes Park, except for a bit of lunch. Using Pam's State Park pass (saving me $20), we drove into the Rocky Mountain National Park. The Ranger at the entrance told us that the road to Bear Lake, where most of the Aspens are located, was congested with traffic, so instead we drove up Trail Ridge road. We found a few Aspens here, but not what I was looking for, so we backtracked to Estes Park, then drove south down highway 7, 72 and 119. Along this route we stopped at many places for some colorful views of the golden trees along the mountain sides, streams and valleys. Click on the above link to see a slide show.

Tuesday, September 22, 2009

The North American Nebula and Pelican Nebula

Click on picture for large view
Now directly overhead in my part of the world (Kansas City area), the North American Nebula and the Pelican Nebula are very rich areas of gas and dust in the Milky Way. The very dark area, right in the middle of the picture, is actually thick dust and gas in front of the nebulae, but it easily marks the similarity to Florida and the Gulf of Mexico. The nebula that looks like a pelican holding a fish in its beak is to the right of the North American Nebula. The bright star at upper right is Deneb, the brightest star in the constellation Cygnus, the swan. This is a very large area of sky. Four full moons would fit in the North American Nebula. From a dark sky site, away from the light pollution of the city, you can see it without optical aid, looking like a brighter region of the Milky Way. Binoculars improve the view, but a telescope has too much magnification not allowing you to make out the over all shape. It is best seen in wide view photographs.
****
Techinical Photo Info:
Camera: Q453 CCD
Lens: Canon 70-200mm f/2.8 L IS
Focal Length setting: 200mm
Aperture setting: f/4
Exposure: 7 X 10 minutes totaling 70 minutes
Darks: 2 darks to create a dark pixel map
Flats: 20
Biases: 0
Mount: Celestron CGE
Guide Camera: Q-Guider by CCD-Labs
Aligned and Stacked in Nebulosity with final processing in Photoshop

Tuesday, September 15, 2009

Gone To The Dark Side


Click on the Images for a large view
Most of the time, astrophotographers try to image dim objects, trying to make them brighter so that they are easier to see. However, there is one type of object in the night sky that emits no light. Because they emit no light, they appear as dark regions among the starry sky. At the upper right of the top picture is the famous Plieades Star Cluster, with its glowing reflection nebulae. The rest of the picture has many areas with very few stars. These are the so called "Dark Nebulae". At one time astronomers thought these were holes in the sky, letting us see space beyond the stars. We now know that instead of holes, what we are seeing is dark clouds of dust and gas so dense that they block the light of the stars behind them. If you can't see the dark nebulae, you need to adjust your monitors brightness setting.
****
The first person to prove this fact was Edward Emerson Barnard in the early part of the last century. E.E. Barnard was a self taught astronomer, who was the first person to use the newly invented camera on the night sky. He obtained thousands of photographic images of the Milky Way, then selected the 50 best for publication in his "Atlas of Selected Regions of the Milky Way". He approved each photograph for each and every book, therefore there were only about 700 books published. Each picture in the book is an actual photograph, not a printing press facsimile. So this is a rare and much sought after book.
****
Along with the photographs, in a seperate volume, there are charts with all the dark nebulae numbered by Barnard. There are 370, with each number starting with the letter B. In the above image, I have captured 15 of these nebulae. Click on the bottom chart to see each numbered object.
****
If you would like to see images from the Atlas, they are on the internet. The Georgia Institute of Technology Library and Informatin Center scanned the book and placed them here: http://www.library.gatech.edu/barnard/
****
Technical Photo Info
Camera: Canon XTi
Lens: Canon 70-200mm f/2.8 L IS
Focal Length setting: 70mm
Apeture setting: f/4
Exposure: 11 X 8 minutes totaling 88 minutes
Darks: 20
Flats: 20
Biases: 20
Mount: Celestron CGE
Guide Camera: Q-Guider by CCD-Labs
Aligned and Stacked in DeepSkyStacker with final processing in Photoshop